As I continue building my cloud security skillset, I’ve been exploring more advanced aspects of networking with AWS private subnets that are essential for creating truly secure cloud environments. Building on my previous project where I implemented VPC security best practices, this post delves deeper into configuring private subnets for enhanced security and isolation.
In this blog post, I’ll share my experience implementing private subnets within Amazon Virtual Private Cloud (VPC) environments. I configured dedicated route tables to control traffic flow, created custom network ACLs to enforce strict access controls, and designed a network architecture that keeps sensitive resources protected from the internet. This project demonstrates how to build a multi-tier network that follows security best practices by properly isolating resources.
This project builds upon my previous AWS work including implementing secure access management with AWS IAM, encrypting data with AWS KMS, and creating basic VPC environments.
Project Overview
Time Investment:
- Approximately 1-2 hours (including configuration, testing, and documentation)
AWS Services Used:
- Amazon VPC
- Subnets
- Route Tables
- Network ACLs
- Security Groups
Key Concepts Learned:
- Network isolation principles
- Public vs. private subnet architecture
- Traffic flow control
- Defense in depth through multiple security layers
- Resource accessibility management
Why Private Subnets Are Essential for Security
Before diving into implementation, here’s why private subnets are vital for cloud security:
Resource Protection:
Private subnets shield sensitive resources like databases from direct internet access
Defense in Depth:
Multiple security layers create redundant protection against threats
Compliance Requirements:
Many regulatory frameworks require network segmentation and isolation
Reduced Attack Surface:
Limiting internet-facing resources minimizes potential entry points for attackers
Controlled Access Paths:
Force traffic through specific, secured network paths for better monitoring and control
Understanding Public vs. Private Subnets
The fundamental difference between public and private subnets is their connectivity to the internet. A public subnet has a route table that includes a route to the internet through an internet gateway, making resources within it directly accessible from the internet. In contrast, a private subnet does not have this route, keeping resources isolated from external networks.
This distinction is critical for security because it allows you to implement a multi-tier architecture where only necessary components (like web servers) are exposed to the internet, while sensitive resources (like databases) remain protected in private subnets.
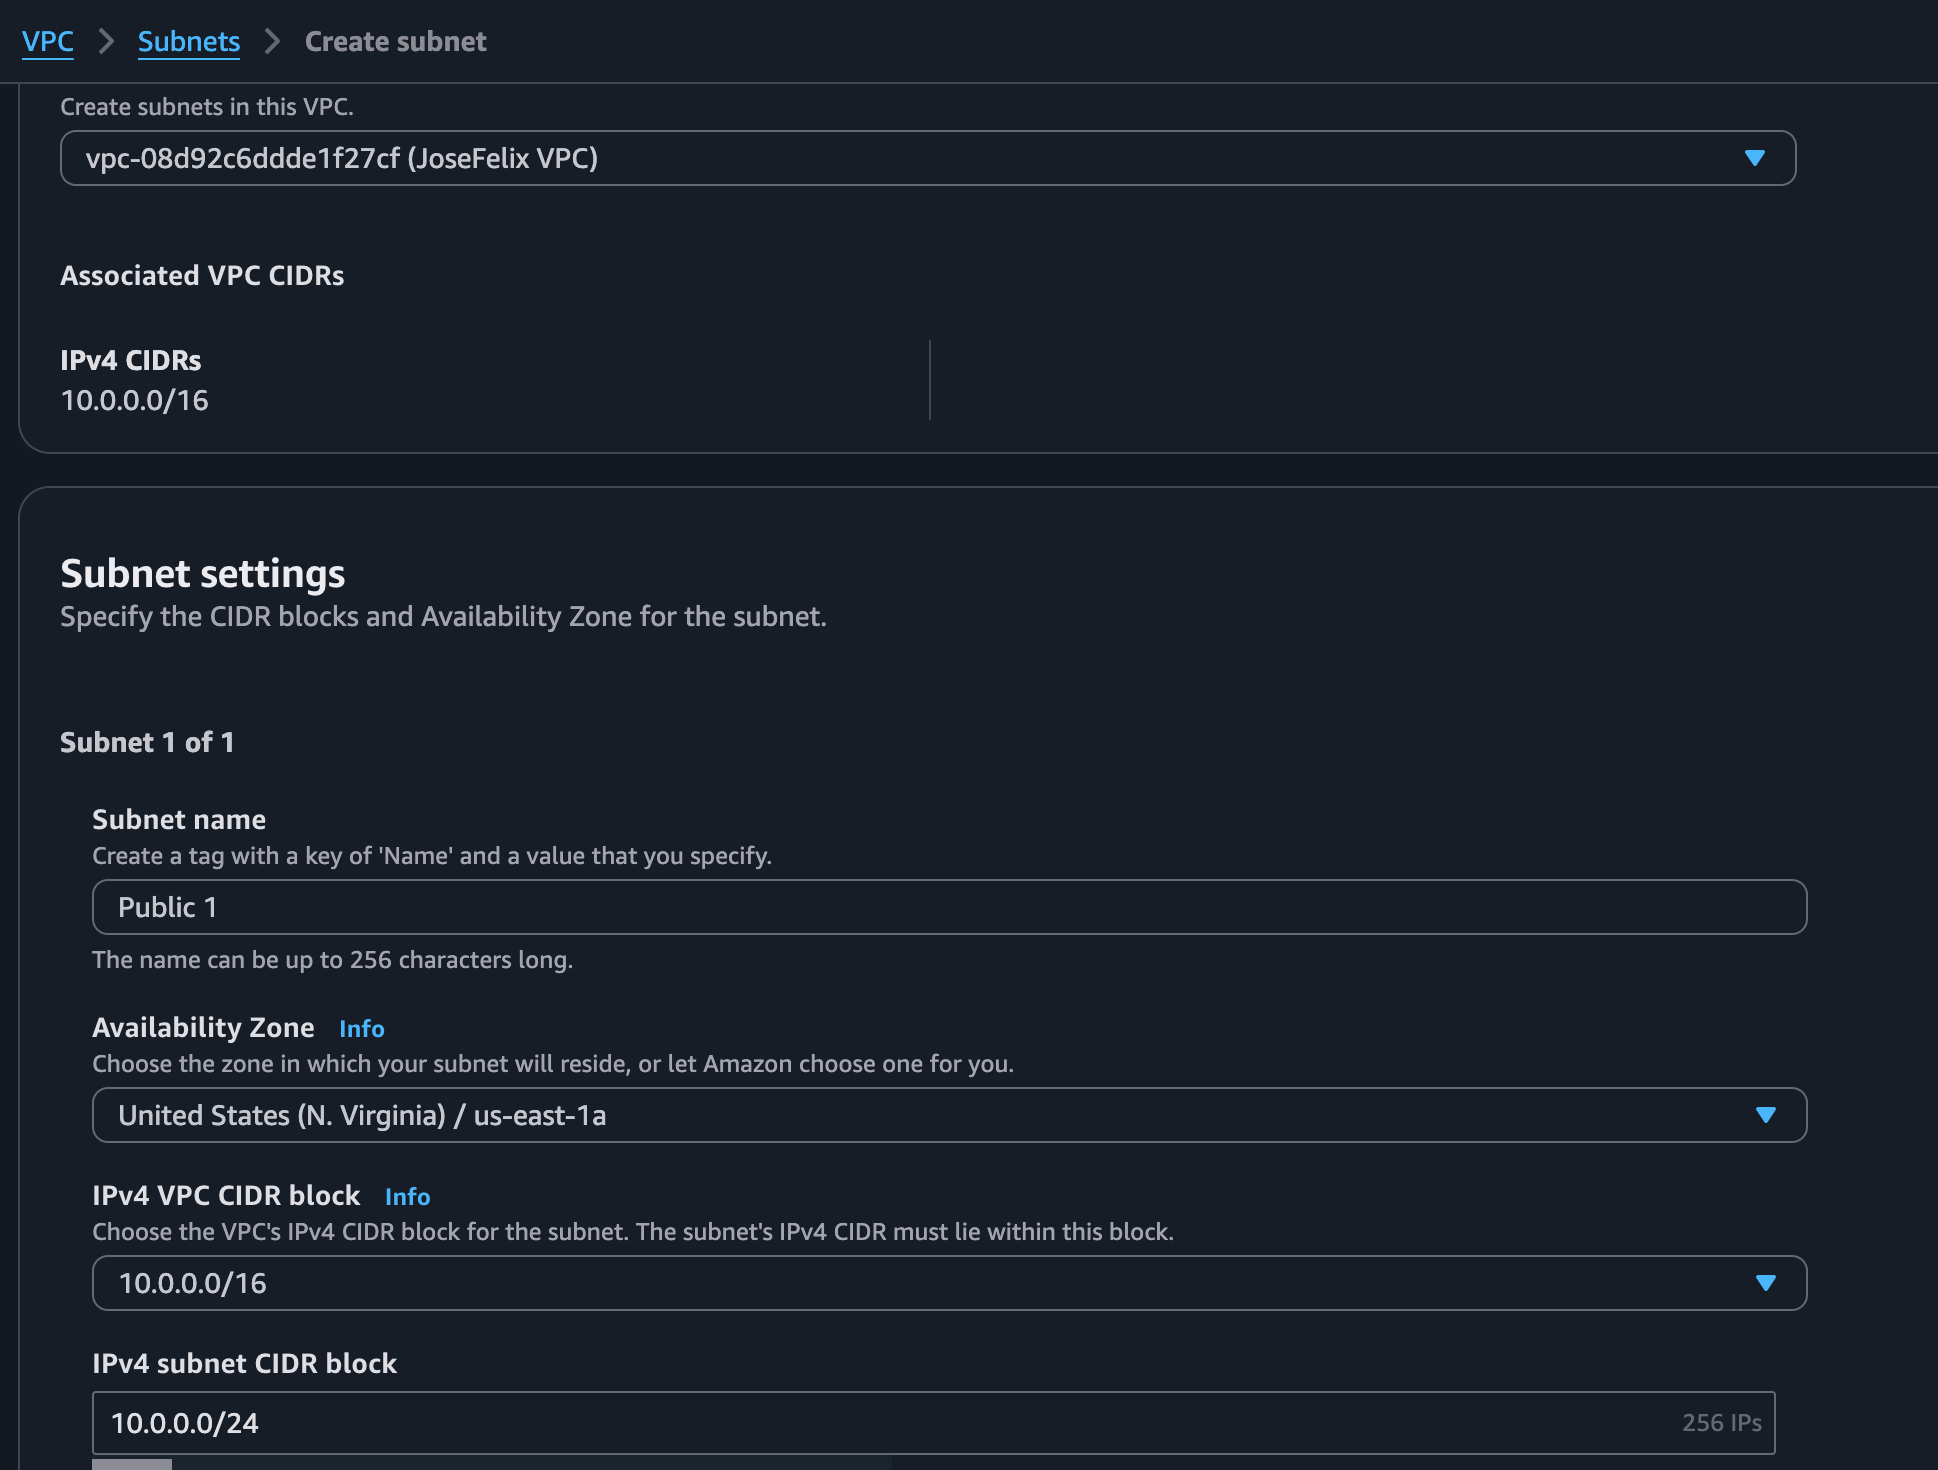
One important technical note: private and public subnets cannot share the same CIDR block. Each subnet within a VPC must have a unique range of IP addresses to prevent overlap and routing issues. For example, if a public subnet uses 10.0.0.0/24, a private subnet might use 10.0.1.0/24.
Step 1: Designing the Network Architecture
I started by carefully planning my subnet architecture to ensure proper isolation while maintaining necessary connectivity between resources. This involved:
- CIDR Block Planning: Allocating appropriate IP address ranges for each subnet
- Availability Zone Selection: Placing subnets in different AZs for high availability
- Connectivity Requirements: Determining which resources need to communicate
- Security Layer Mapping: Planning multiple security controls at different network levels
This planning phase is crucial because changing network architecture after resources are deployed can be complex and disruptive.
Step 2: Implementing the Private Subnet
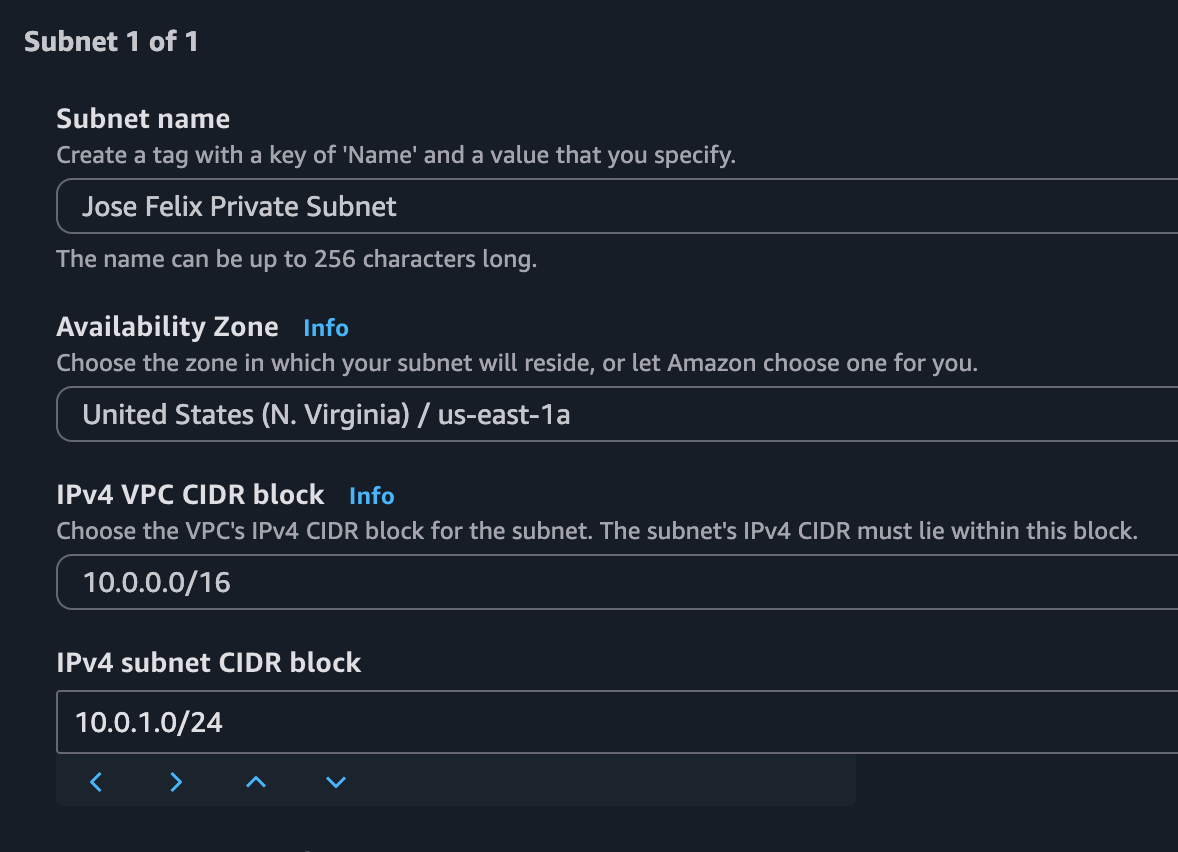
After creating my VPC and public subnet in a previous project, I added a private subnet with these specific steps:
- Navigated to the VPC dashboard and selected “Subnets”
- Clicked “Create subnet” and selected my existing VPC
- Named the subnet “Private Subnet” for clear identification
- Selected an Availability Zone different from my public subnet for redundancy
- Assigned a CIDR block of 10.0.1.0/24, ensuring no overlap with my public subnet (10.0.0.0/24)
- Configured the subnet with the “Auto-assign public IPv4 address” setting disabled
The private subnet was created with default associations to the main route table of the VPC, which I would change in the next step to enforce proper isolation.
Step 3: Creating a Dedicated Route Table
By default, my private subnet was associated with the main route table that was created when the VPC was set up. However, since I needed to control traffic flow differently for my private subnet, I created a dedicated route table:
- In the VPC dashboard, selected “Route Tables” and clicked “Create route table”
- Named it “Jose Felix Private Route Table” and associated it with my VPC (vpc-08d92c6ddde1f27cf)
- Selected the new route table and viewed its routes – it only contained the local route (10.0.0.0/16) allowing traffic within the VPC
- Unlike my public subnet’s route table, I deliberately did not add a route to the internet gateway
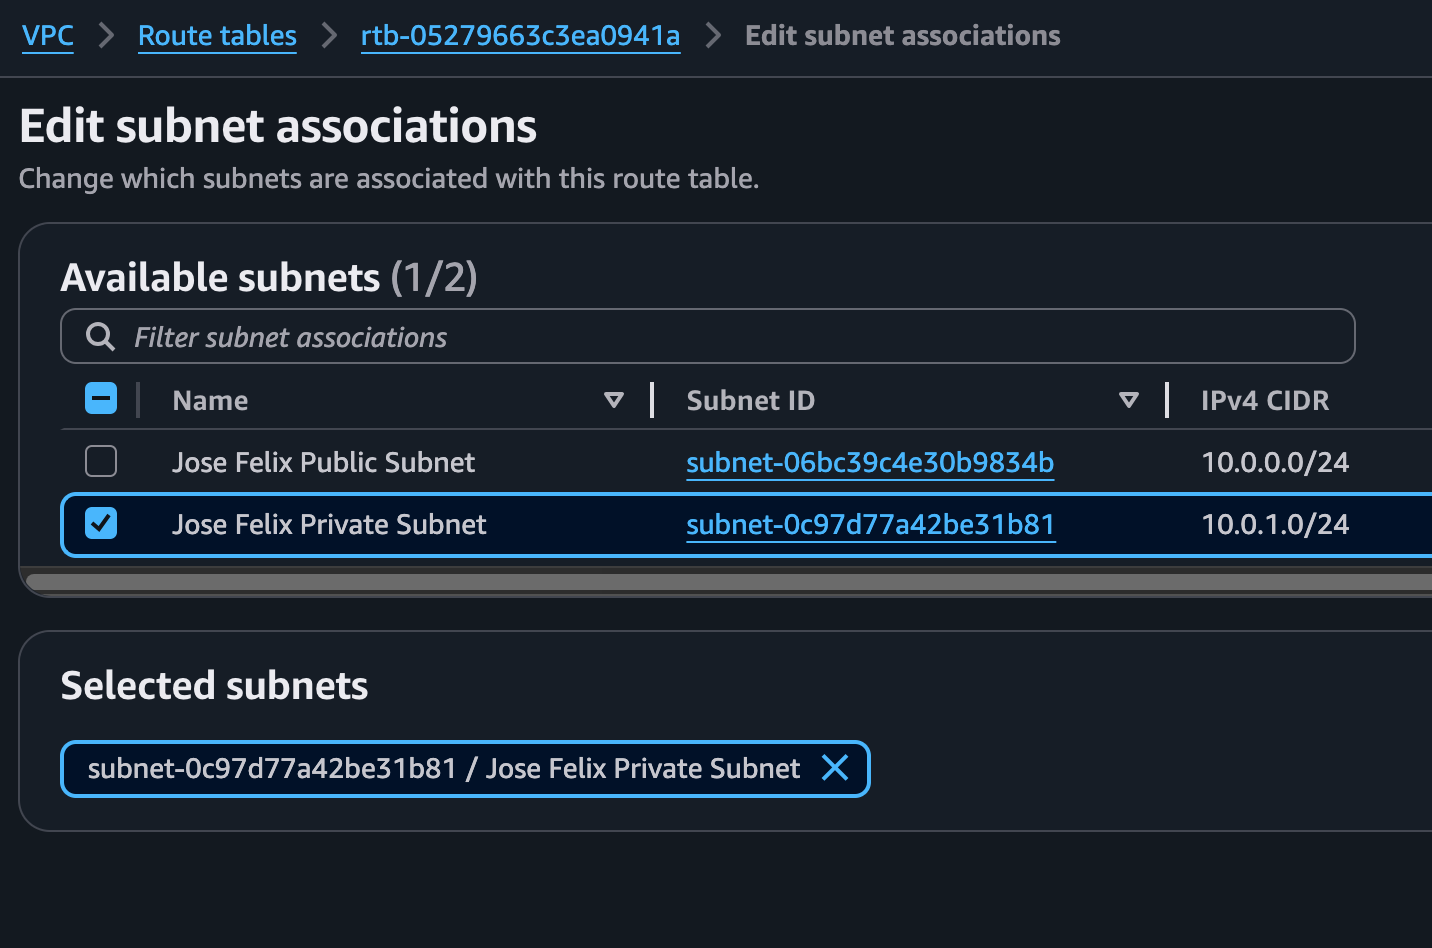
- Under the “Subnet Associations” tab, explicitly associated my private subnet (subnet-0c97d77a42be31b81) with this route table
This configuration ensures that resources in the private subnet can communicate with other resources in the same VPC, but do not have a route to the internet or any external networks. Copy
Jose Felix Private Route Table Configuration:
Destination     | Target
--------------- | ---------------
10.0.0.0/16     | local
Notice the absence of a 0.0.0.0/0 route to an internet gateway, which is what keeps the subnet truly private. When I successfully updated the subnet associations, AWS confirmed with a notification that the private subnet was now explicitly associated with my custom route table.
The screenshots clearly show the private subnet (10.0.1.0/24) is now controlled by this dedicated route table, ensuring it remains isolated from internet traffic while still allowing communication with other resources inside the VPC.
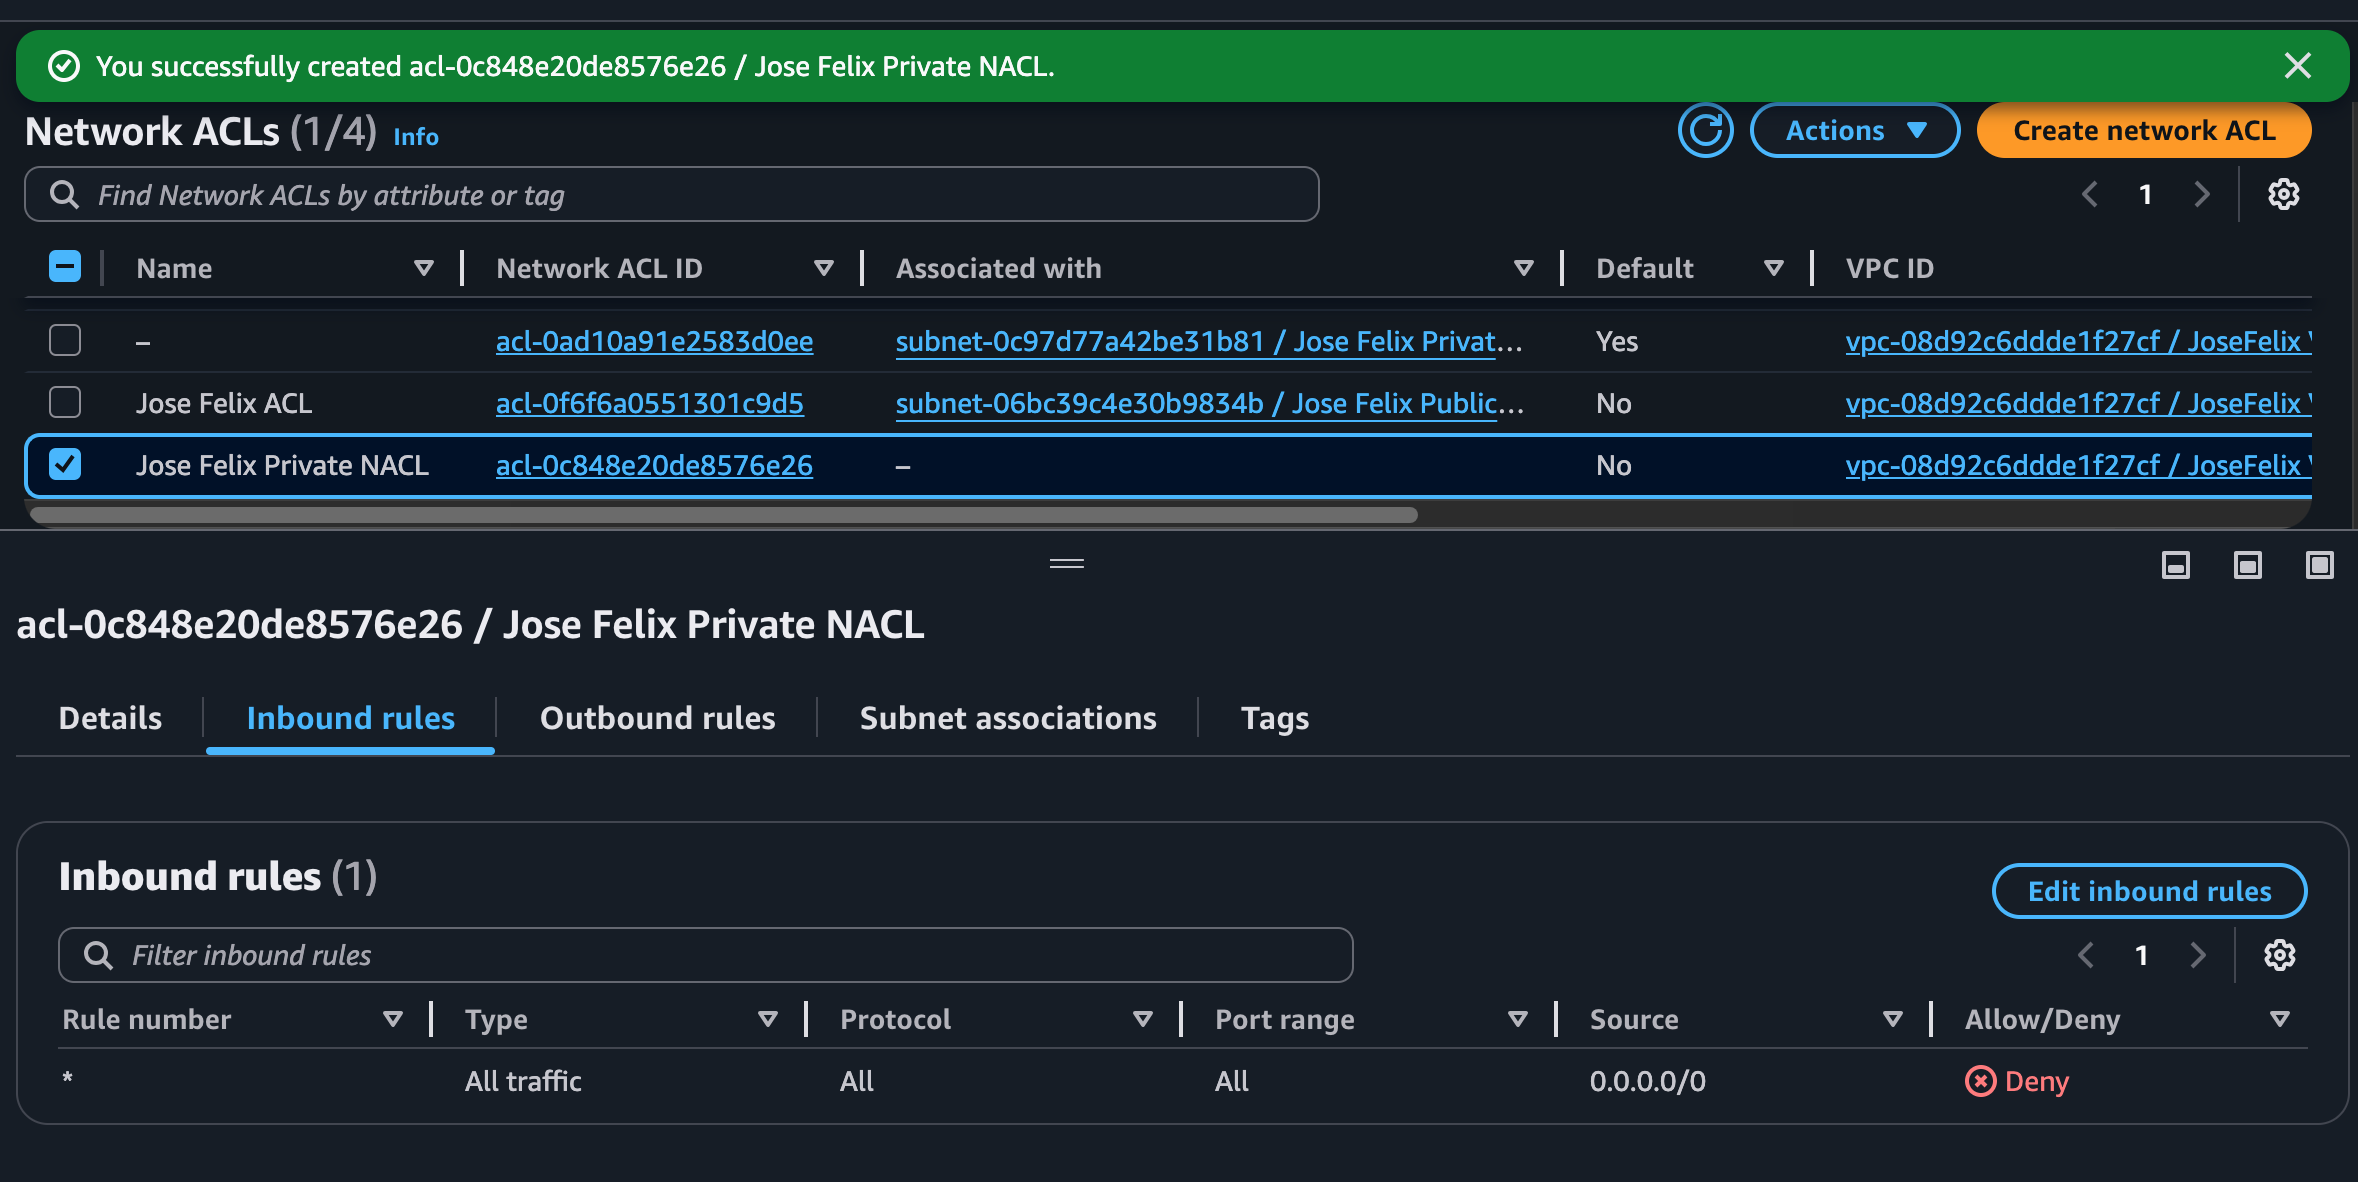
Step 4: Implementing Custom Network ACLs
Network Access Control Lists (NACLs) provide an additional layer of security at the subnet level. I created a custom NACL specifically for my private subnet to enforce strict access controls:
- In the VPC dashboard, selected “Network ACLs” and clicked “Create network ACL”
- Named it “Private Subnet NACL” and associated it with my VPC
- Selected the new NACL and noted that, unlike the default NACL, it started with all traffic denied
- Added an inbound rule allowing SSH (port 22) traffic only from the public subnet’s CIDR block
- Added an inbound rule allowing application-specific traffic on port 3306 (MySQL) from the public subnet
- Added outbound rules to allow responses to return to the public subnet
- Explicitly associated the custom NACL with my private subnet
One thing I didn’t expect was that custom network ACLs start by denying all traffic by default. This is different from the default NACL that automatically allows all traffic, making it important to carefully plan and implement allow rules.
Inbound Rules:
Rule #  | Type       | Protocol | Port Range | Source      | Allow/Deny
------- | ---------- | -------- | ---------- | ----------- | ----------
100     | SSH (22)   | TCP      | 22         | 10.0.0.0/24 | ALLOW
200     | MySQL      | TCP      | 3306       | 10.0.0.0/24 | ALLOW
*       | All Traffic| All      | All        | 0.0.0.0/0   | DENY

Outbound Rules:
Rule #  | Type       | Protocol | Port Range | Destination | Allow/Deny
------- | ---------- | -------- | ---------- | ----------- | ----------
100     | Custom TCP | TCP      | 1024-65535 | 10.0.0.0/24 | ALLOW
*       | All Traffic| All      | All        | 0.0.0.0/0   | DENY
This configuration ensures that only specific traffic from the public subnet can reach resources in the private subnet, while all other traffic is blocked.
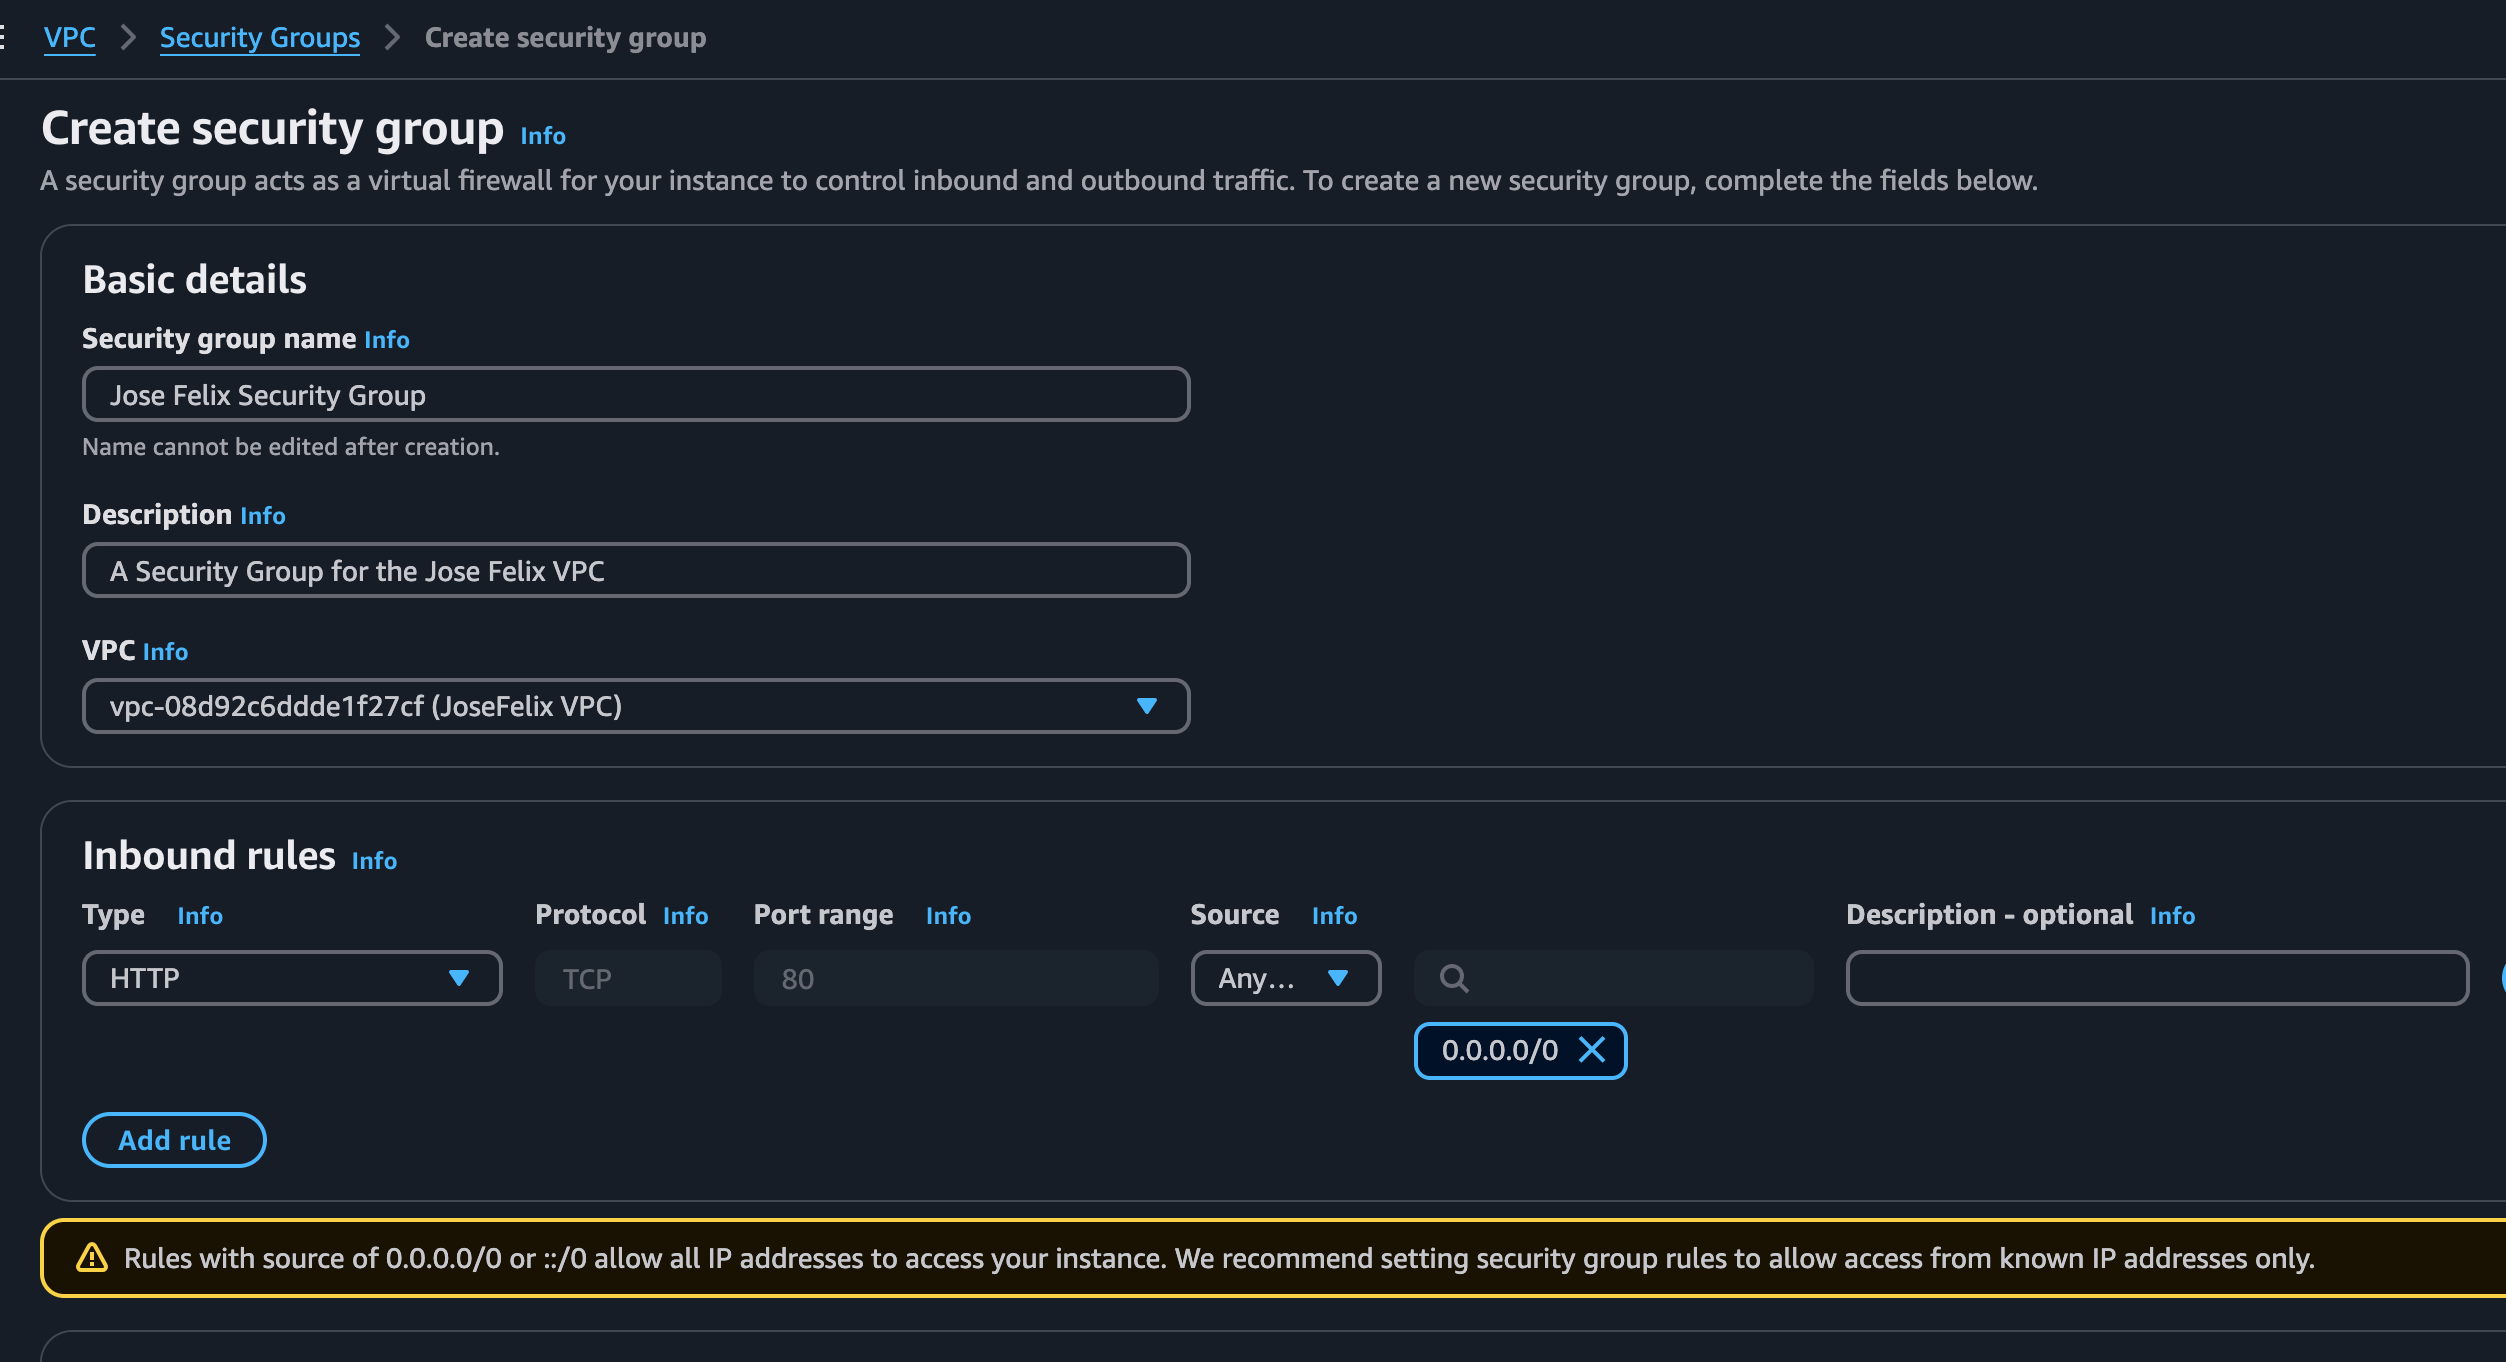
Step 5: Securing Resources with Security Groups
While NACLs operate at the subnet level, security groups provide resource-level security. I created a dedicated security group for resources in my private subnet:
- In the VPC dashboard, selected “Security Groups” and clicked “Create security group”
- Named it “Private Resources SG” and added a description
- Associated it with my VPC
- Added an inbound rule for SSH (port 22) traffic, but instead of using a CIDR block as the source, I specified the security group ID of my public subnet resources
- Added an inbound rule for MySQL (port 3306) using the same security group source
- Left the outbound rules as default (allowing all outbound traffic)
Using a security group as the source is a powerful technique that ensures only instances with that specific security group attached can access the private resources, regardless of their IP address. This provides more flexible and maintainable security than using IP-based rules.
Security Group Configuration:
Inbound Rules:
Type       | Protocol | Port Range | Source
---------- | -------- | ---------- | ------
SSH        | TCP      | 22         | sg-123456 (Public Instances SG)
MySQL      | TCP      | 3306       | sg-123456 (Public Instances SG)

Outbound Rules:
Type       | Protocol | Port Range | Destination
---------- | -------- | ---------- | -----------
All Traffic| All      | All        | 0.0.0.0/0
Challenges and Solutions
Understanding Default Behaviors:
One challenge I faced was understanding the default “deny all” behavior of new NACLs compared to the “allow all” default of the VPC’s original NACL. I had to ensure I added all necessary allow rules or resources would be completely inaccessible.
Solution: I created a checklist of required traffic flows and methodically implemented rules to allow each necessary communication path.
Testing Network Isolation:
Verifying that private resources were truly isolated from the internet while still accessible from public subnet resources required careful testing.
Solution: I launched test instances in both subnets and performed connectivity tests from various sources to confirm proper isolation.
Managing Rule Complexity:
As the number of rules grew, maintaining a clear understanding of what was allowed and denied became more challenging.
Solution: I implemented a strict naming convention and documentation process for all rules, clearly stating their purpose and the security principle they enforced.
Key Takeaways and Best Practices
This project reinforced several important AWS networking security principles:
Layered Security Approach:
Combining route tables, NACLs, and security groups creates multiple layers of protection
Default Deny Strategy:
Start with denying all traffic and only allow what’s specifically required
Security Group References:
Use security group references instead of IP addresses when possible for more maintainable rules
Strict Outbound Controls:
Don’t overlook outbound rules; restrict outbound traffic to only what’s necessary
Documentation is Critical:
Maintain clear documentation of your network design and security controls
What’s Next?
Building on this private subnet foundation, my upcoming projects will explore:
- Implementing NAT Gateways for controlled outbound internet access from private subnets
- Setting up VPC Endpoints for secure access to AWS services without internet exposure
- Creating Transit Gateways for centralized network management across multiple VPCs
- Implementing AWS Network Firewall for advanced traffic inspection
- Automating security validation with AWS Config and custom rules
Each of these projects will build upon the security foundation established through proper subnet isolation to ensure comprehensive protection for cloud resources.
Conclusion
Implementing proper private subnet isolation within AWS VPCs was a valuable learning experience that demonstrated the importance of network segmentation in cloud security. The ability to control traffic at multiple levels with complementary security mechanisms provides the foundation for a robust security architecture.
As a US Navy veteran transitioning into Cloud Security, I found this project particularly relevant because it mirrors military defense strategies: creating security perimeters, implementing checkpoint controls, and establishing clear communication channels between secure zones.
Have you implemented private subnets in your AWS environment? What challenges did you face with network isolation? Let me know in the comments below!
Stay tuned for my upcoming projects as I continue building expertise in AWS networking and security services.
Additional Resources:


